How to use Microsoft office word
Part1
Creating a Basic Document

1

2
Review the available templates. On the right side of the screen, you'll
see several templates of interest:
·
Blank
document - A blank document
with default formatting.
·
Creative
Resume/Cover Letter - A clean,
pre-formatted resume (and accompanying cover letter) document.
·
Student
Report with Cover Photo -
A document format geared toward an academic demographic.
·
Fax
Cover Sheet - A document to
preface fax reports.
·
You can also search
for specific templates online from within Word by using the search bar at the
top of this screen.
3
Choose a template. Doing so will open the template in Word with whatever
pre-determined formatting applies to it. Now that your document is open, you're
ready to review your Toolbar options.
·
When in doubt, open a
blank document.
Navigating the Microsoft Word Toolbar

1
Click the File tab. It's
in the top left side of the screen (or in the menu bar for Mac users). From
here, you have several useful options on the far left side of your screen:
·
Info
(PC only) - Click this to
review the documents statistics, such as when it was last modified, as well as
any potential issues with the document.
·
New - Click this to bring up the "New
Document" page that lists all of the pre-formatted templates. Opening a
new document will prompt you to save your old one.
·
Open - Click this to review a list of
recently-opened documents. You can also select a directory (e.g., "This
PC") in which to search.
·
Save - Click this to save your document. If
this is your first time saving this particular document, you'll be prompted to
enter a name, save location, and preferred file format as well.
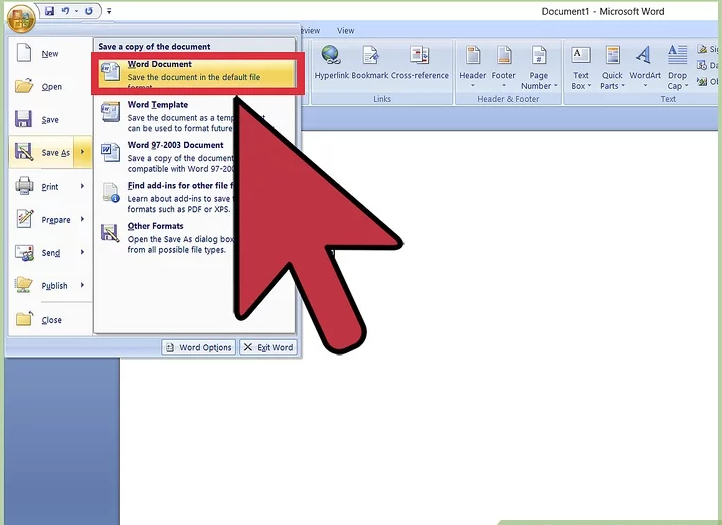
·
Save
As - Click this to
save your document "as" something (e.g., a different name or file
format).
·
Print - Click this to bring up your printer
settings.
·
Share - Click this to view sharing options for
this document, including email and cloud options.
·
Export - Click this to quickly create a PDF or
change the file type.

2
Click ← in the top left corner of your screen. If you're using a Mac, you won't have
this option--simply click your document to exit the "File" menu.

3
Review the Home tab to see your formatting options. At the top of your screen--from left to
right--are five sub-sections of this tab:
·
Clipboard - Whenever you copy text, it is saved on
your clipboard. You can view copied text by clicking the Clipboard option here.
·
Font - From this section, you can change your
font style, size, color, formatting (e.g., bold or italic), and highlighting.
·
Paragraph - You can change aspects of your
paragraph formatting--such as line spacing, indentation, and bullet
formatting--from this section.
·
Styles - This section covers different types of
text for various situations (e.g., headings, titles, and subtitles). You'll also
see the popular "No Spacing" option here, which removes excess spaces
between lines of text.
·
Editing - A couple of commonly-used tools--such
as "Find and Replace", which allows you to quickly replace all
appearances of one word with another--live here.

4
Click the Insert tab to review the types of media you can place in your
document. Insert is to the
right of the Home tab. The Insert tab allows you to add things like graphics
and page numbers to your document. From left to right, a couple of notable
options include the following:
·
Table - Clicking this option will allow you to
create an Excel-style table right in your document.
·
Pictures - Use this feature to insert a picture
into your document.
·
Header,
Footer, and Page Number -
These options are all essential for writing in MLA- or APA-style formatting.
The Header places a space at the top of the document for comment, while the
Footer goes at the bottom--page numbers are customizable.
·
Equation/Symbol - These options use special formatting
to accurately display simple equations. You can select these equations or
symbols from the pertinent drop-down menu.

5
·
The Design tab
contains pre-designed themes and formats listed across the top of the page.

6
Click the Layout tab to customize your page's formatting. This tab contains options for changing
the following aspects of your document:
·
Margins
·
Page orientation
(vertical or horizontal)
·
Page size
·
Number of columns
(defaults to one)
·
Location of page
breaks
·
Indentation

7
Click the References to manage your citations. If you have a bibliography page, you can
also manage it from here.
·
For quick bibliography
formatting, click the Bibliography drop-down menu and select a template.
·
In the "Citations
& Bibliography" group of options, you can change your bibliography
formatting from APA to MLA (or other citation styles).
·
The
"Captions" group has an option to insert a table of figures. This is
useful for scientific review papers or similar documents in which statistical
data is prioritized over quotations.

8
Click the Mailings tab to review your document sharing options. You can review your email settings and
share your documents from within this section.
·
You can also print an
envelope or label template by clicking the pertinent option in the top left
corner of your screen.
·
The Select Recipients drop-down menu allows you to choose Outlook contacts as
well as an existing contact list within Word.

9
Click the Review tab. The
Review section is geared towards editing, so it includes options for marking up
documents and proofreading. A couple of important options include:
·
Spelling & Grammar
- Click this option (far left corner) to underline any spelling or grammatical
errors.
·
The
"Changes" section - This is to the far right of the toolbar. From
here, you can enable the "Track Changes" feature which automatically
formats any additions or deletions you make in a document to appear in red
print.

10
Decide on the set of options that best apply to your work. If you're a student, for example, you'll
likely use the Insert and References tab often. Now that you're familiar with
the toolbar options, you can format your first Word document.
Formatting Your Writing

1

2
·
If you opened an
existing document, be sure to save your work before re-formatting.

3
Highlight a section of text. To do this, click and drag your cursor across your
writing, then let go when you've highlighted the section you wish to edit.

4
·
Quickly format your
writing. Do this by right-clicking (or two-finger clicking) your highlighted
text and then selecting an option from the right-click menu.
·
Change the font of
your selection. You can do this by clicking the drop-down bar at the top of the
"Font" section (Home tab) and then selecting a new font.
·
Bold, italicize, or
underline your highlighted section. To do this, click the B, I, or U in the "Font" section of the Home tab.
·
Change your document's
spacing. This is easiest to accomplish by right-clicking your selected text,
clicking Paragraph, and modifying the "Line Spacing"
value in the bottom right corner of this window.
5
Continue working with
Word. Your preferred
options for your documents will differ based on the intention behind creating
them, so the more you work within your own particular format, the more
proficient you'll become.


Comments
Post a Comment